upgrading a PRS SE Custom 24
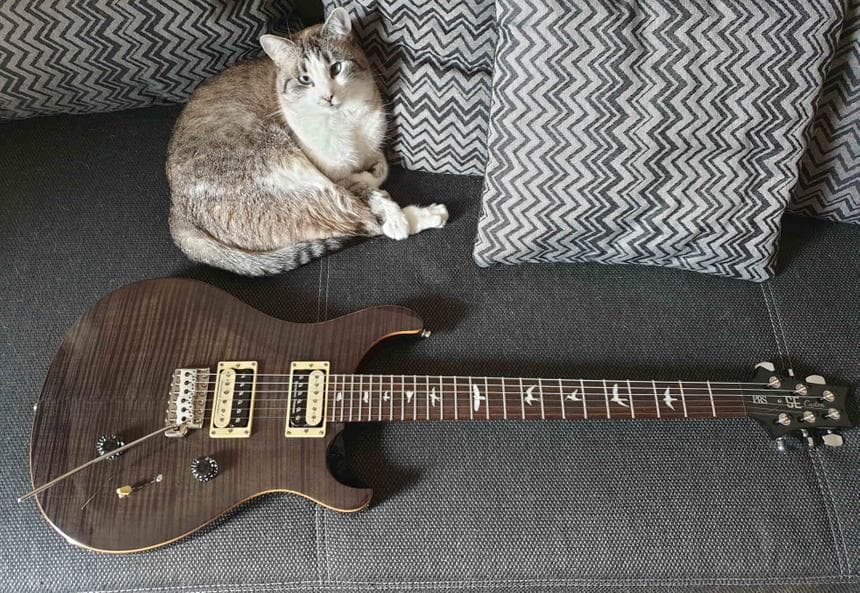
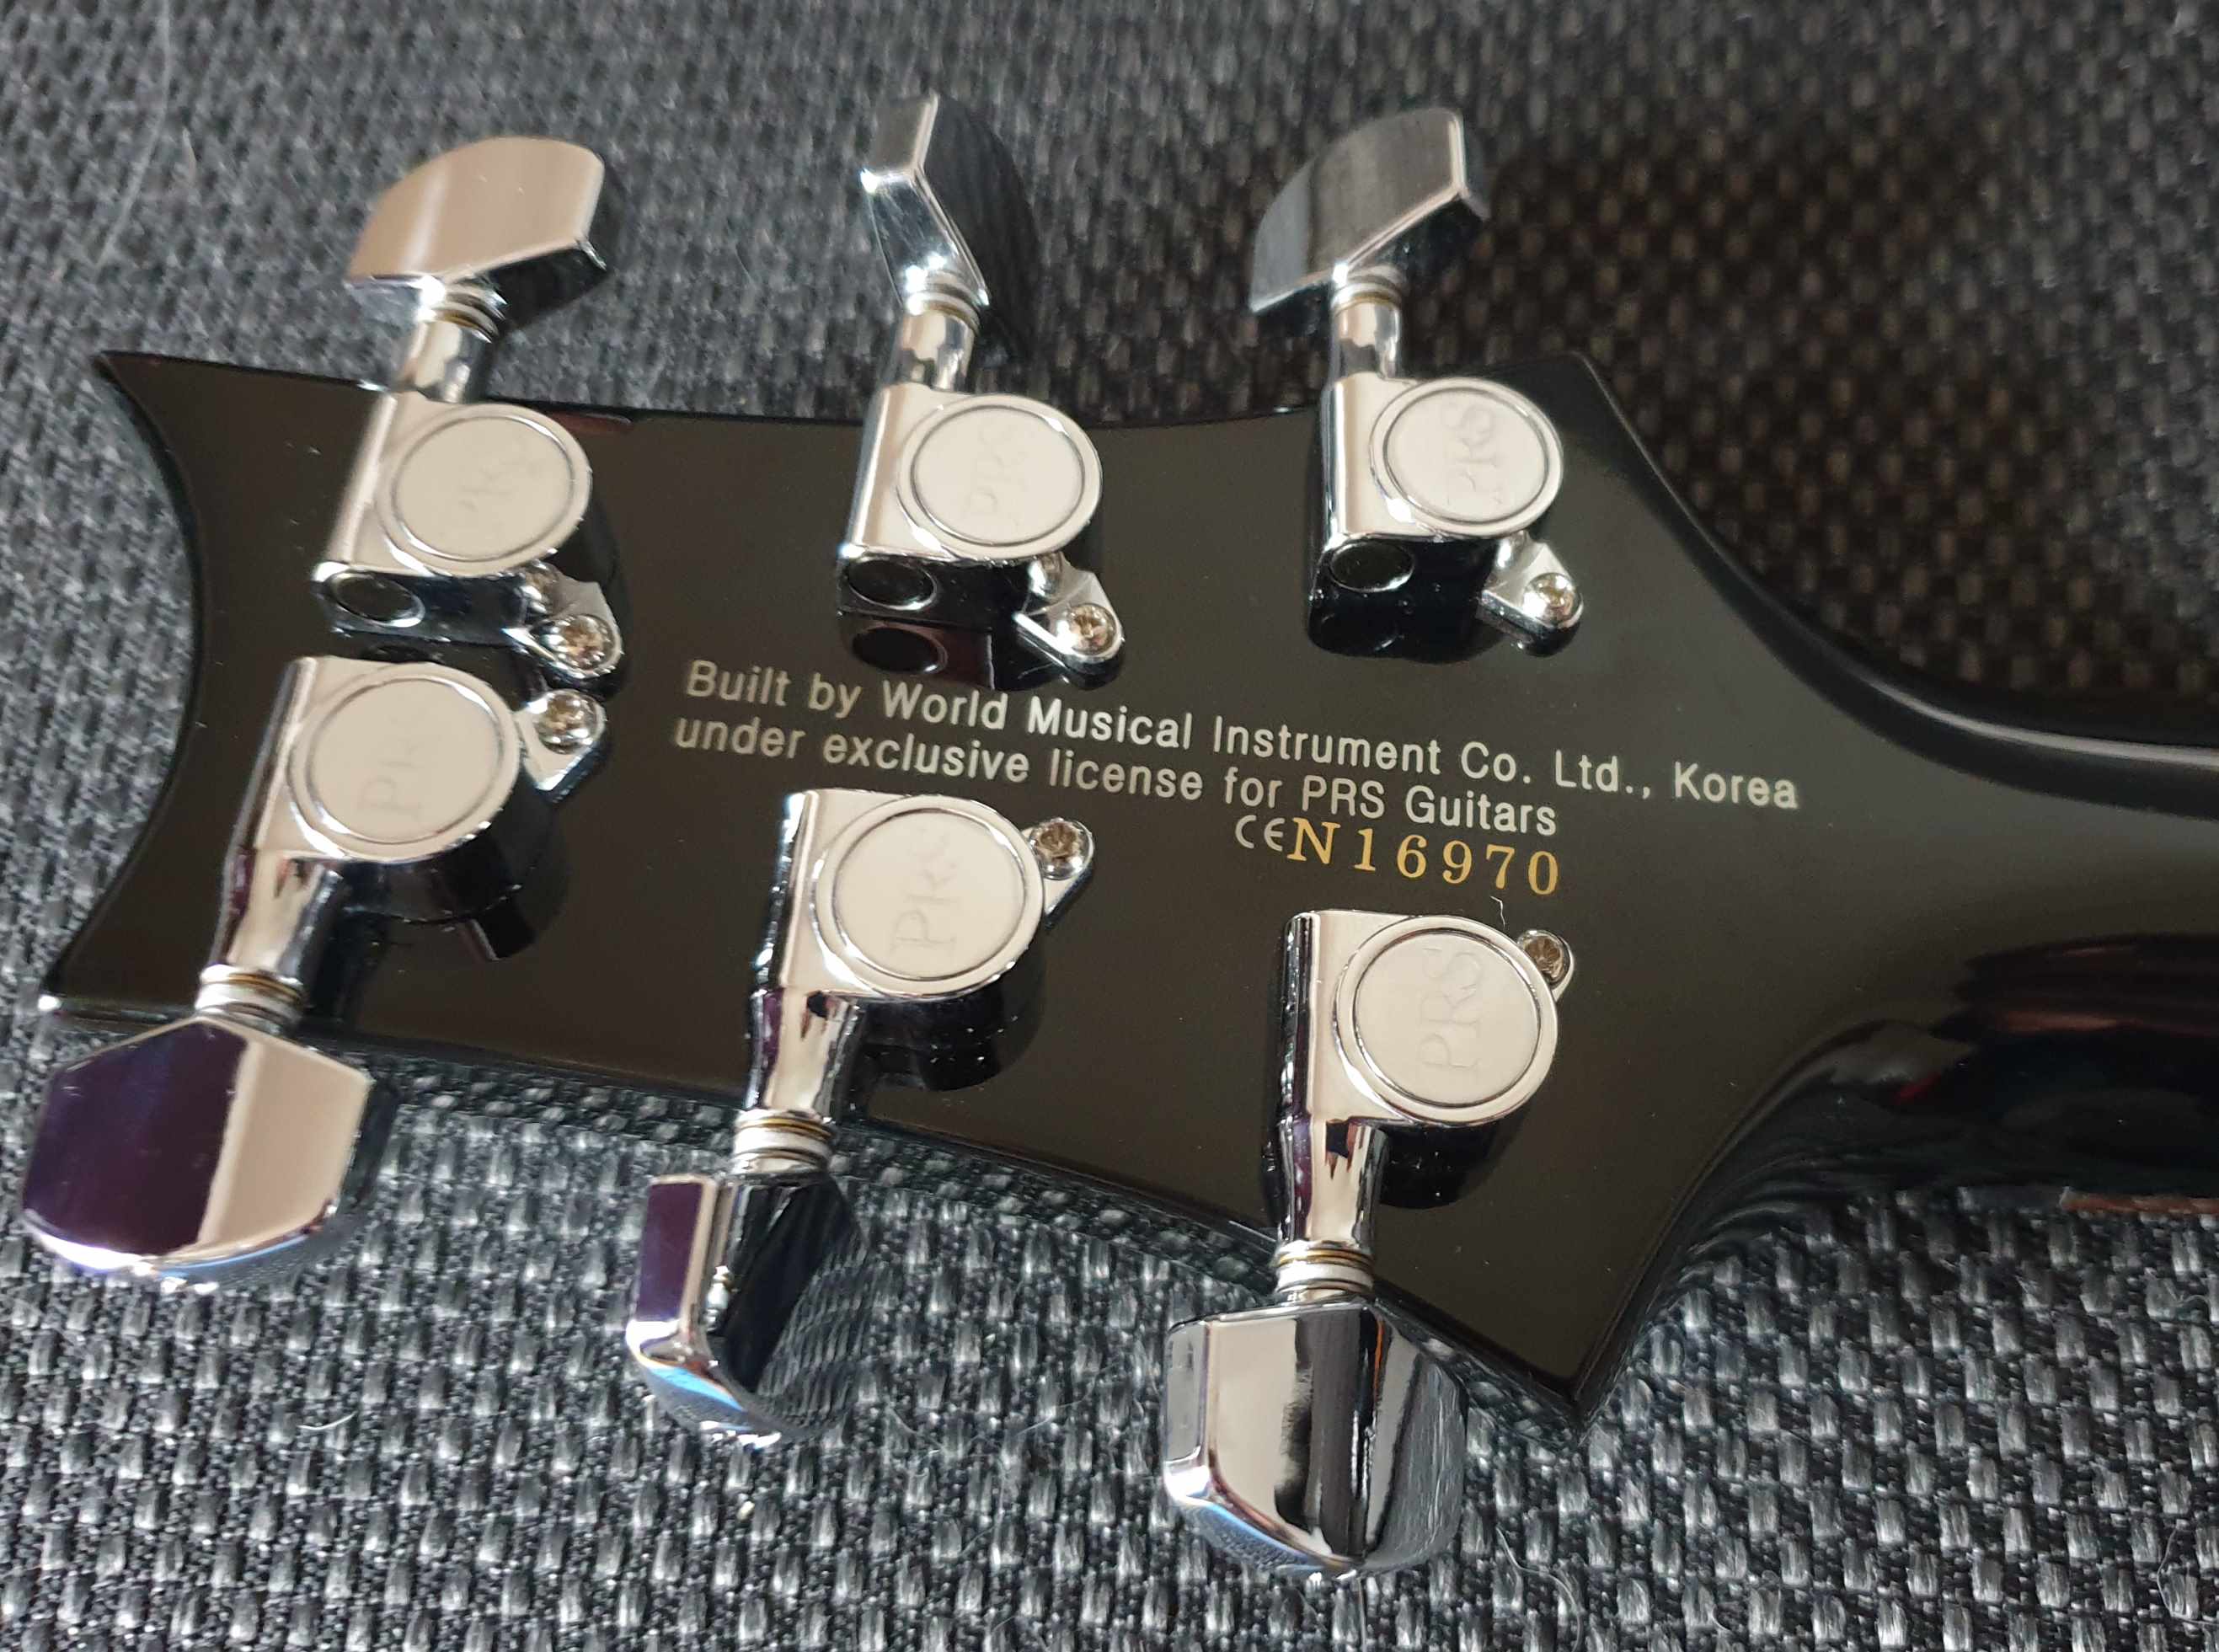
I got my SE Custom 24 in 2013, mostly inspired by my musical heroes in Opeth and Porcupine Tree. PRS were manufacturing the SEs in Korea at that time, at World Musical Instrument Co. Ltd. In 2019 the SE production moved to Cortek in Indonesia.
Despite this being a "cheap" instrument (700-800 Euro cheap), I'd say it's held up quite well over the years. Here's a picture of the first fret (and the most worn off) after 7-8 years of use:
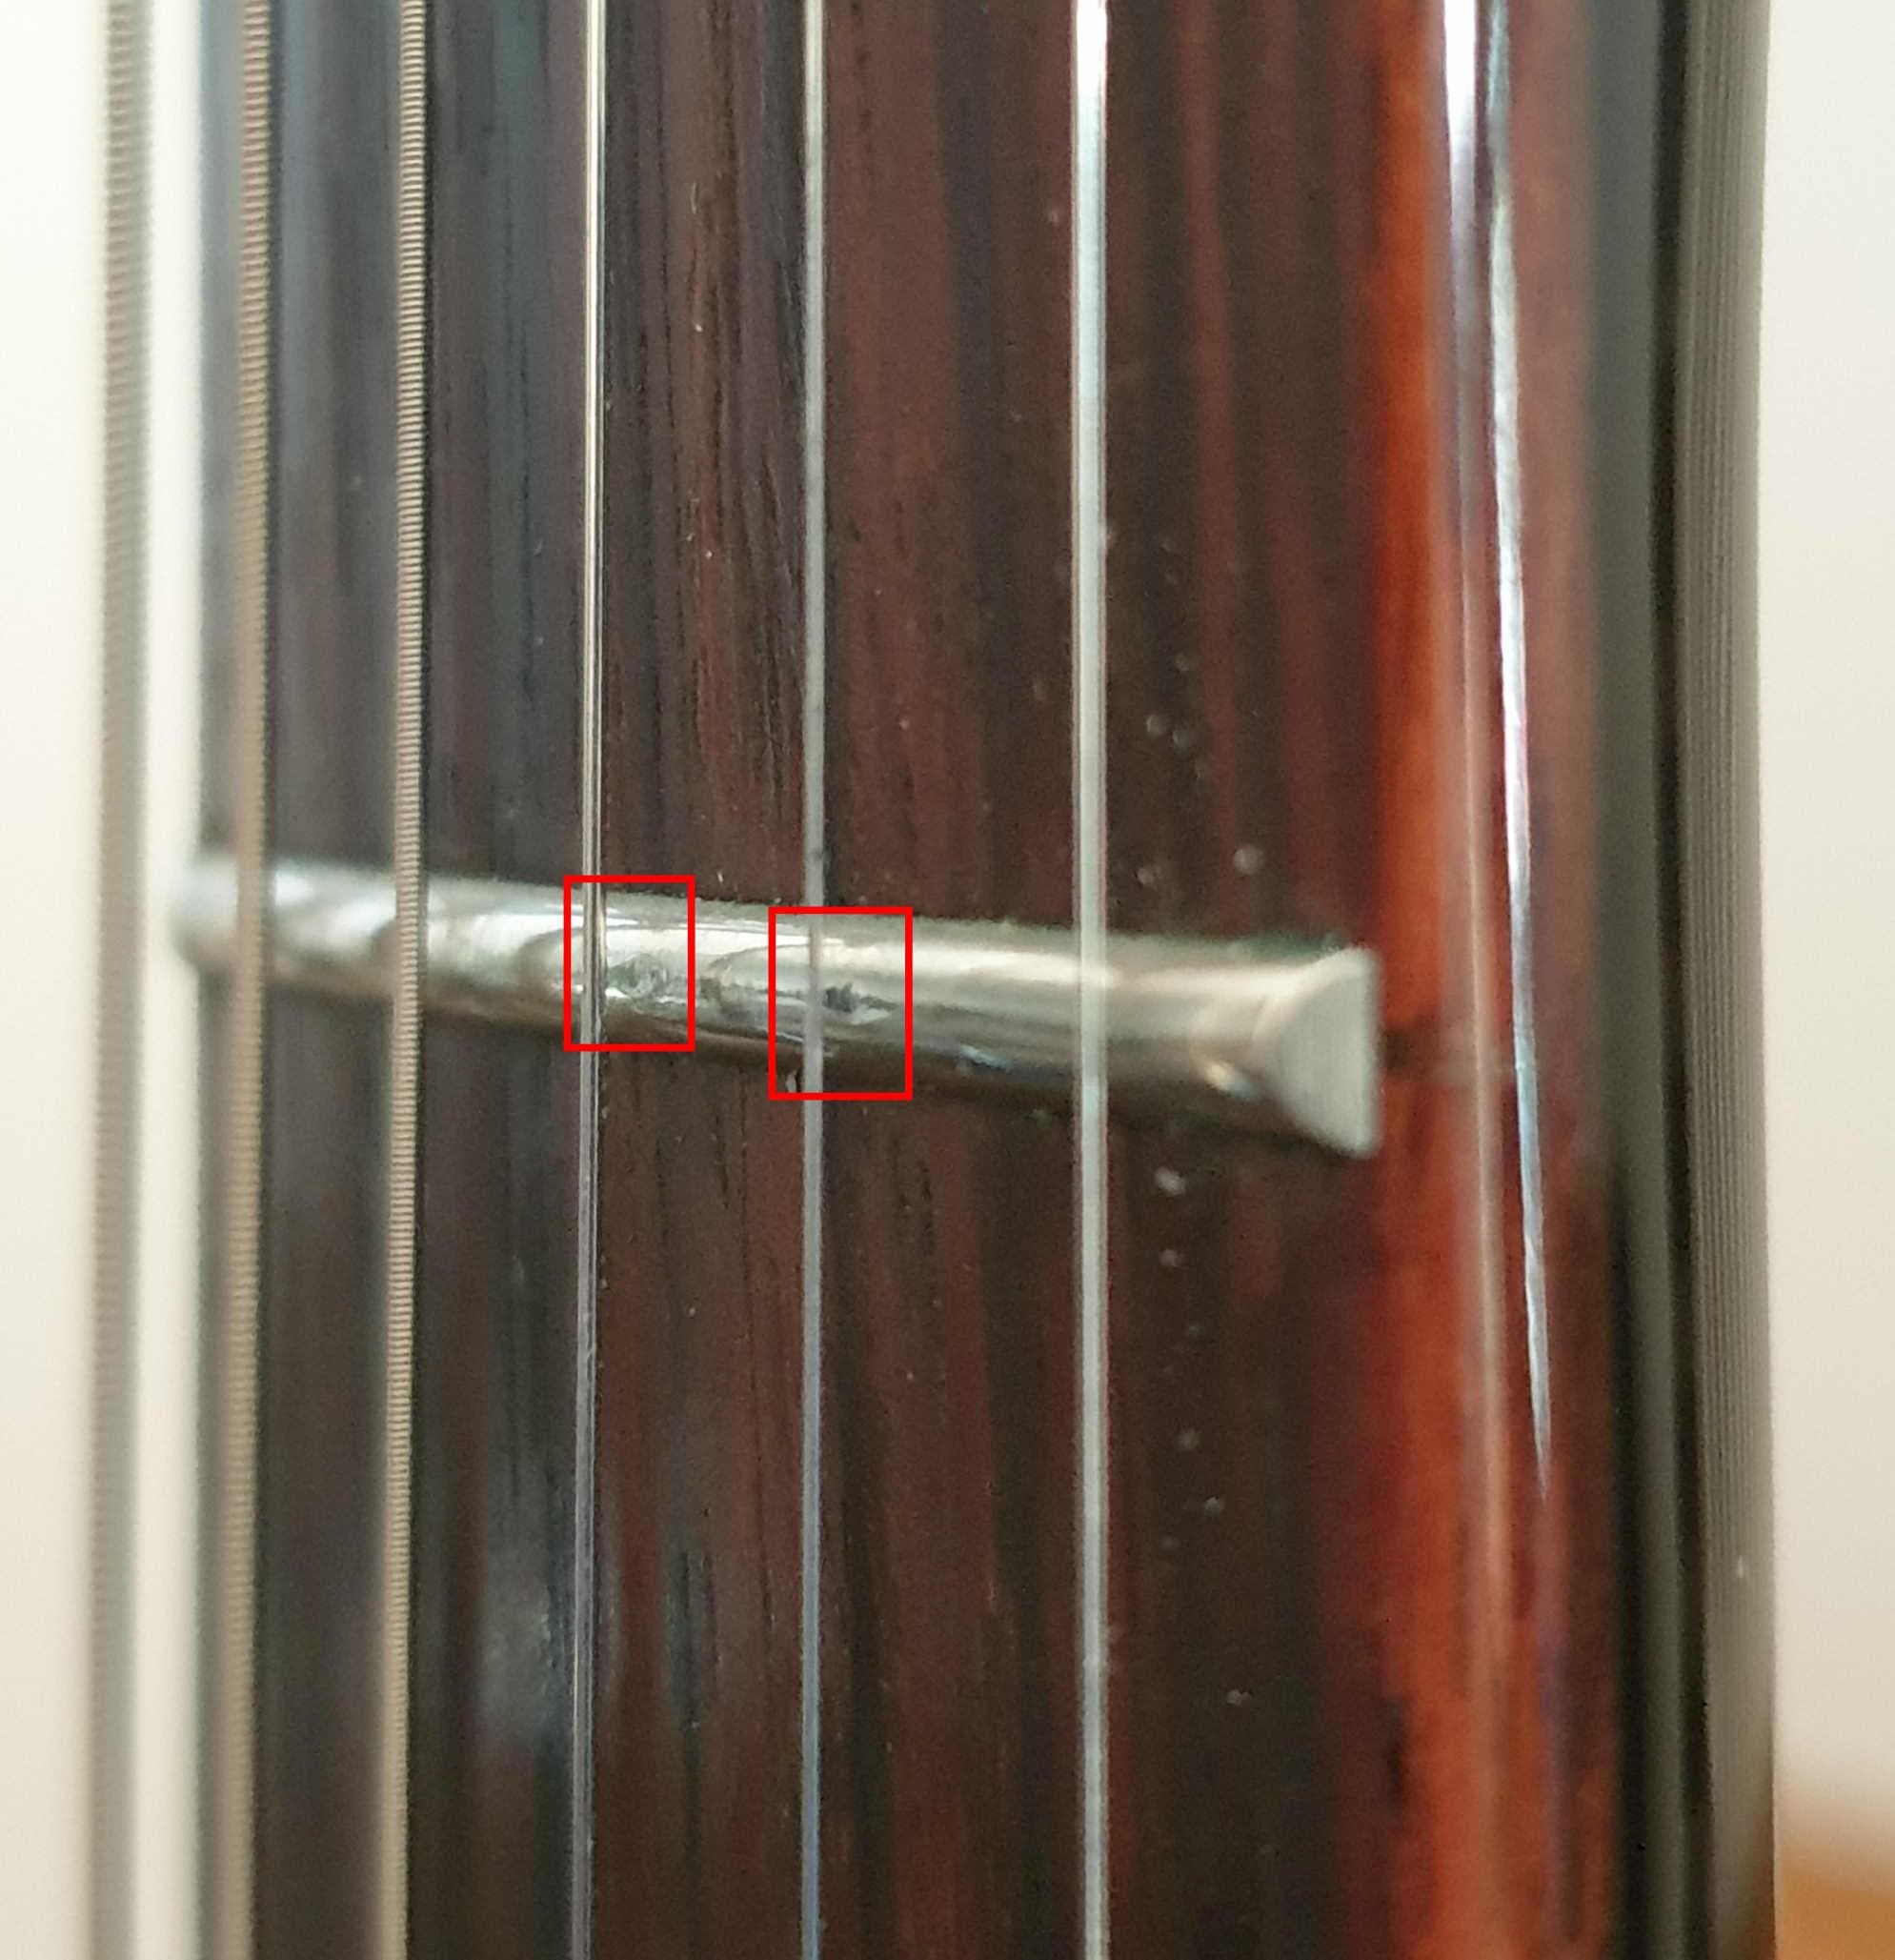
This was always with 0.009"-0.042" D'Addario NYXL0942 strings and I probably have 10 more years until I should be concerned about refretting.
Locking Tuners
The very first upgrade, one I did in early 2020 was replacing the default PRS tuners and machine heads with the drop-in PRS ACC-4337 SE Locking Tuner CH set.
Each individual machine head is held in place by 2 screws, a small one on the back of the instrument, preventing rotation, and a big one that goes through the headstock and is locked with a hex nut on the front side of the headstock. The operation is easy enough - first remove the hex nut, then remove the small screw on the back. The small screw doesn't need to be tightened too hard, while the nut can be until it doesn't move anymore.
I actually used the nuts and the screws from the original set, despite the fact that the replacement locking set included its own.
Pickups
This is the more complicated one because it involves a little soldering, of which some people are afraid.
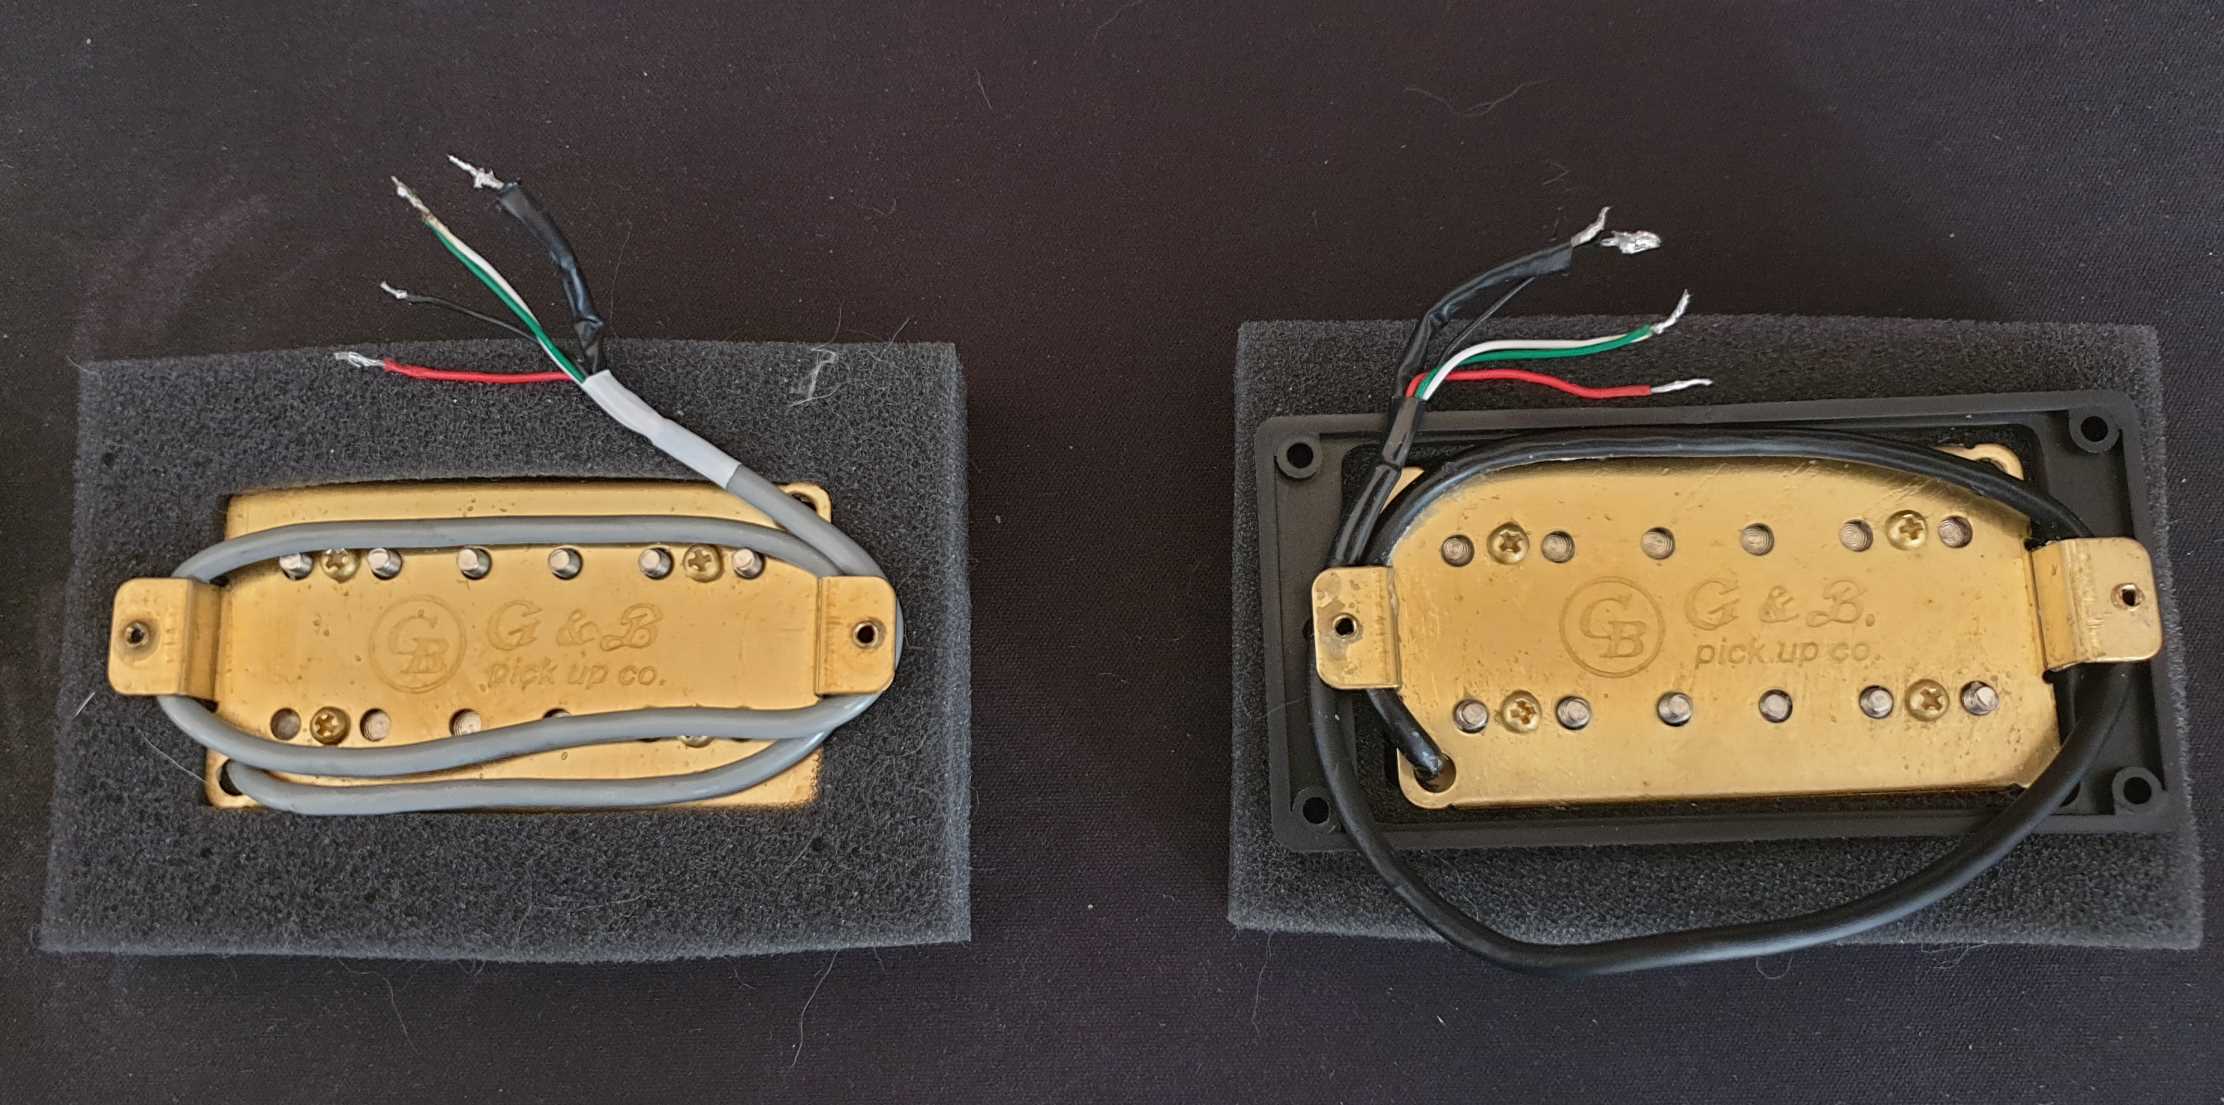
The original pickups are SE versions of the PRS Vintage Bass (neck) and PRS HFS (bridge) and are manufactured by G&S:
One of the more logical replacements for pickups on the SE Custom 24 is the pair consisting of:
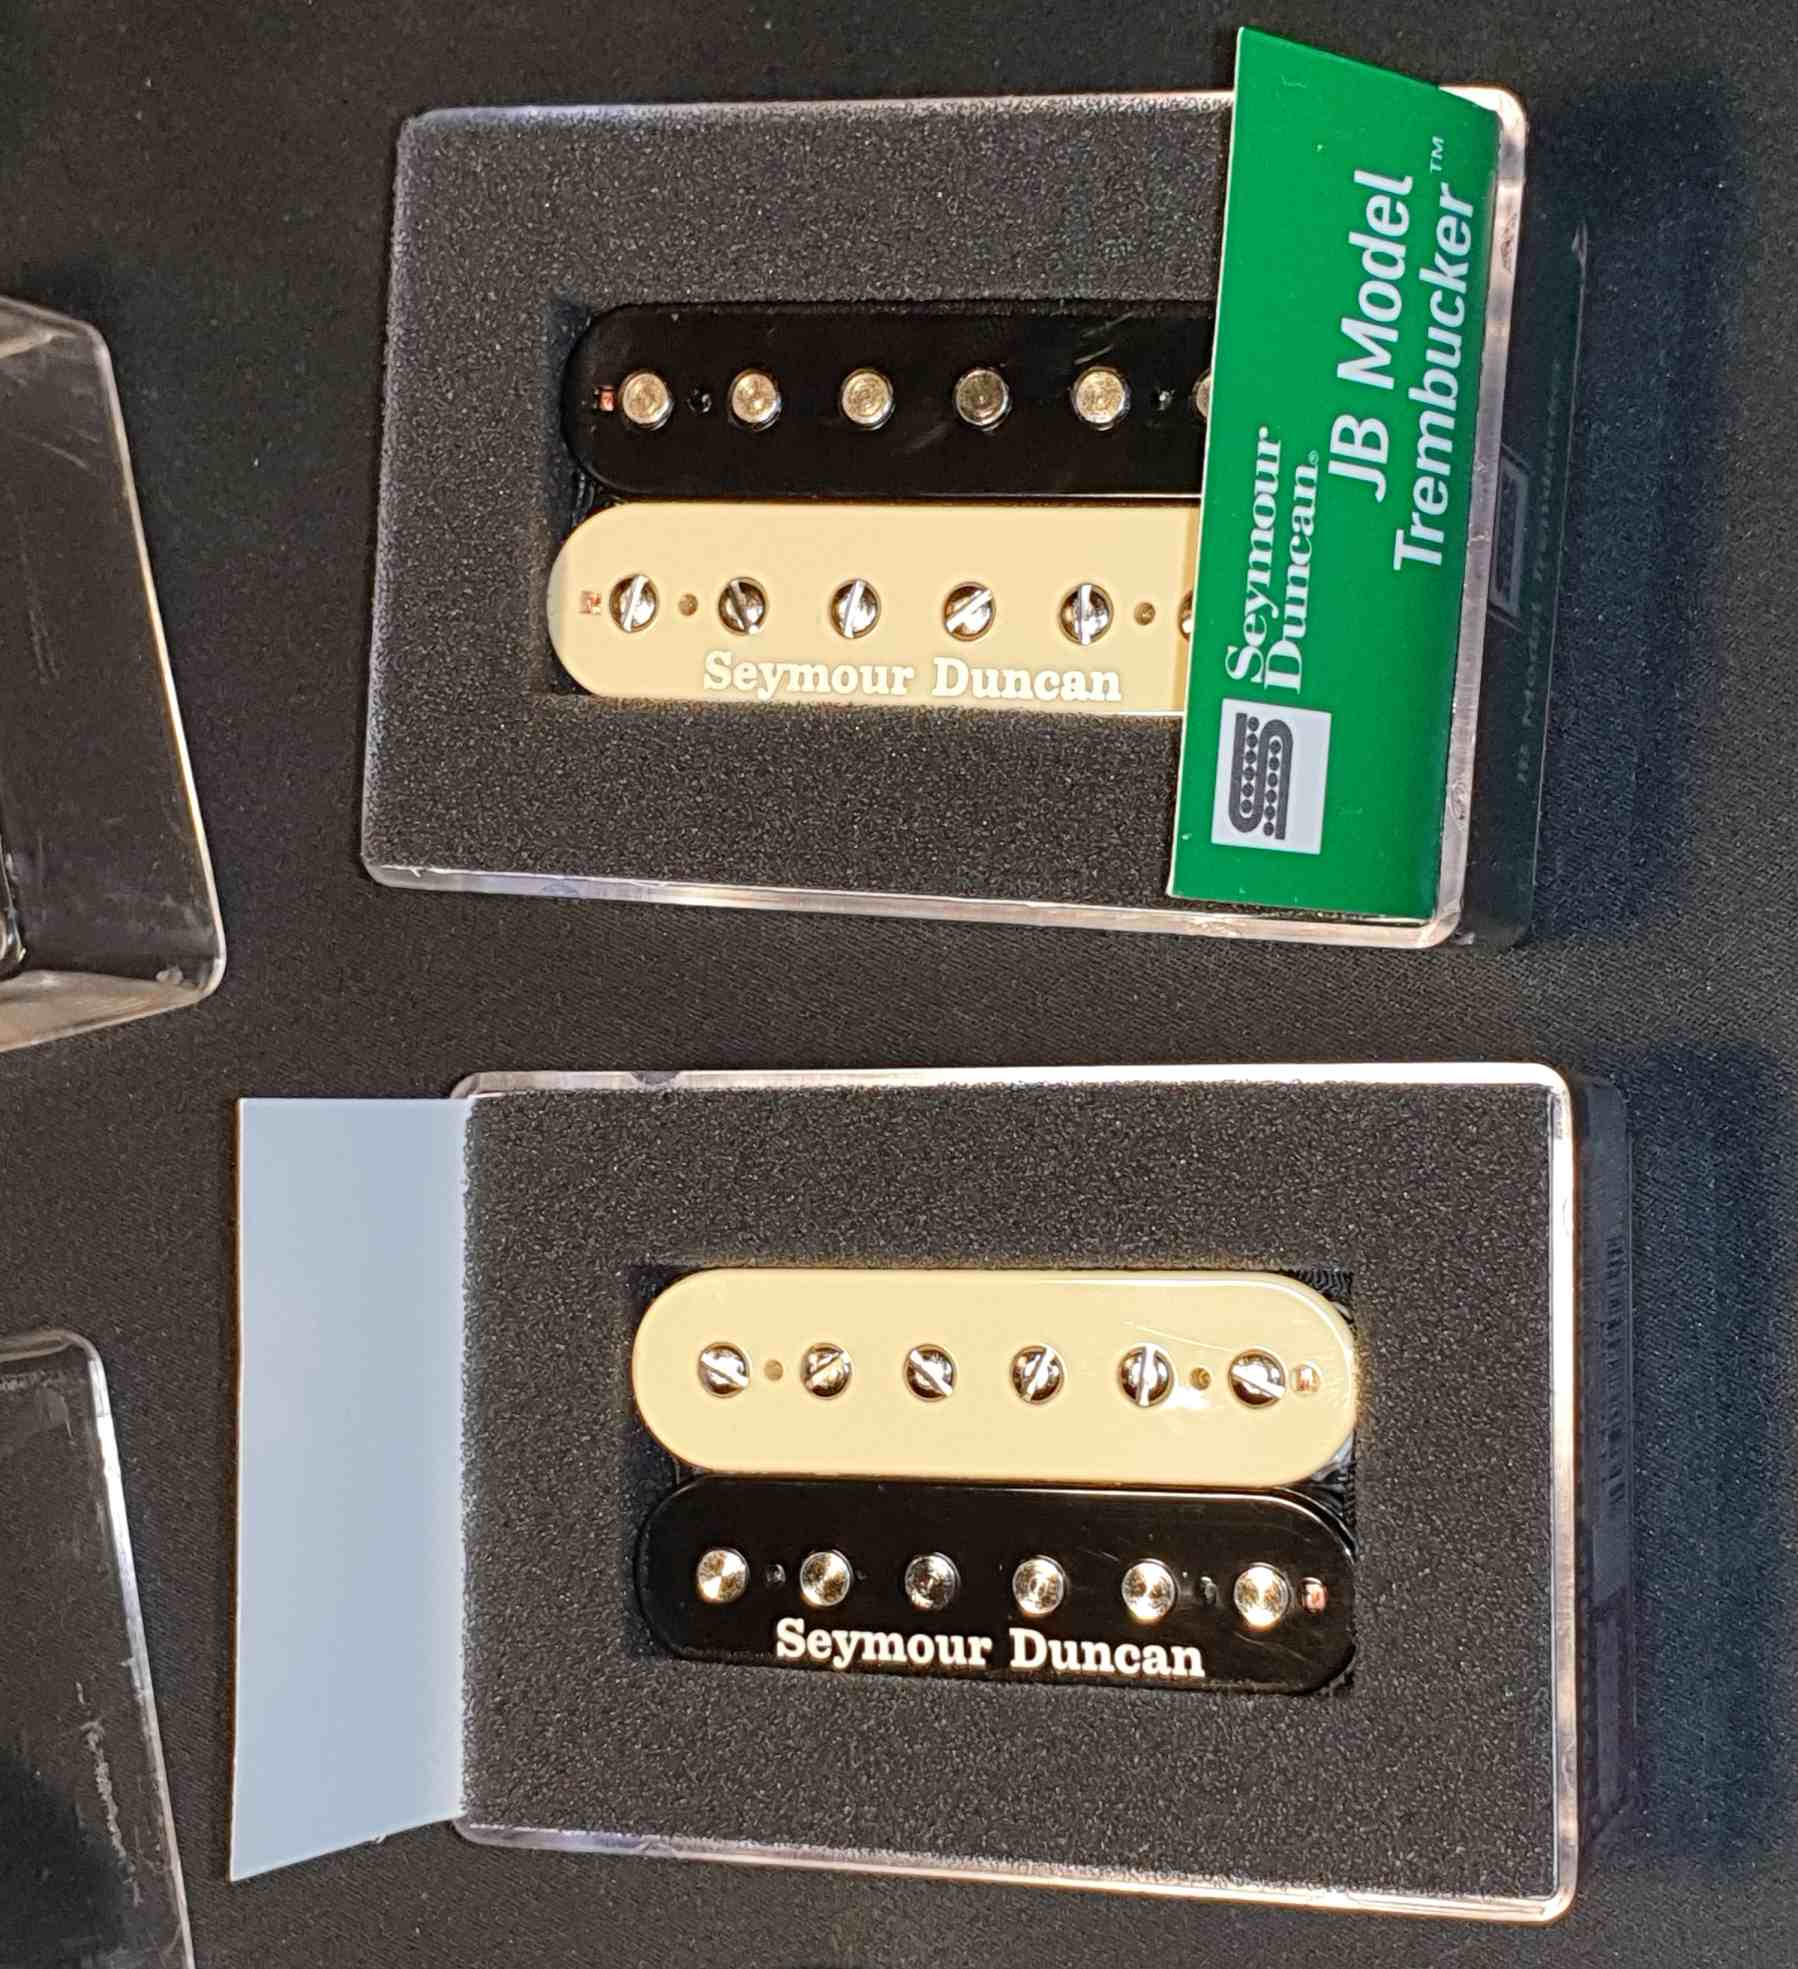
- Seymour Duncan JB Trembucker - for the bridge. The "trembucker" part is important, it means, in Seymour Duncan terminology, that the humbucker is a couple of millimeters longer, matching the SE's 53 mm string distance at the bridge. A normal pickup instead of a "trembucker" would also work.
- Seymour Duncan Jazz - for the neck.
Wiring
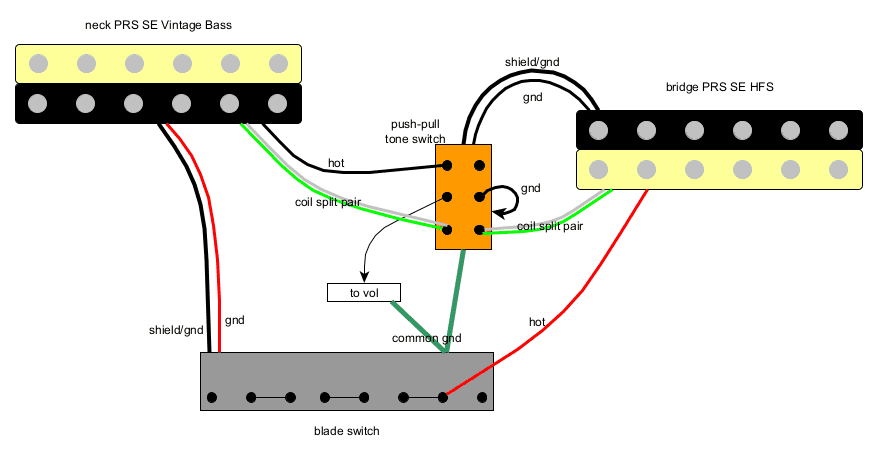
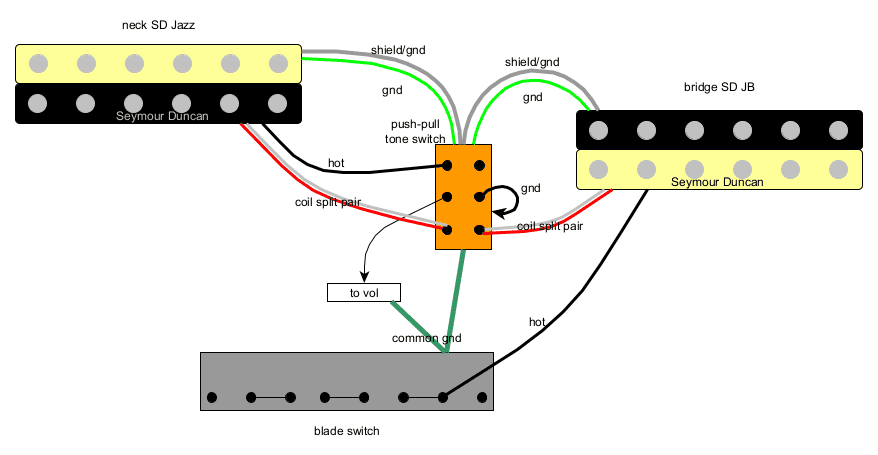
My PRS SE and Seymour Duncan pickups have the following colors for the wires:
| Pickup | Sleeve color | Hot | Coil split | Ground |
|---|---|---|---|---|
| Neck G&B Vintage Bass | Gray | Black | White + Green | Red |
| Bridge G&B HFS | Black | Red | White + Green | Black |
| Neck SD Jazz | Black | Black | White + Red | Green |
| Neck SD JB | Black | Black | White + Red | Green |
All of the above pickups actually consist of 5 cables, the 4 enumerated and the "shield" cable, which is bundled within a separate black sleeve for G&B and just a bunch of thin gray nickel wires laying around for Seymour Duncan.
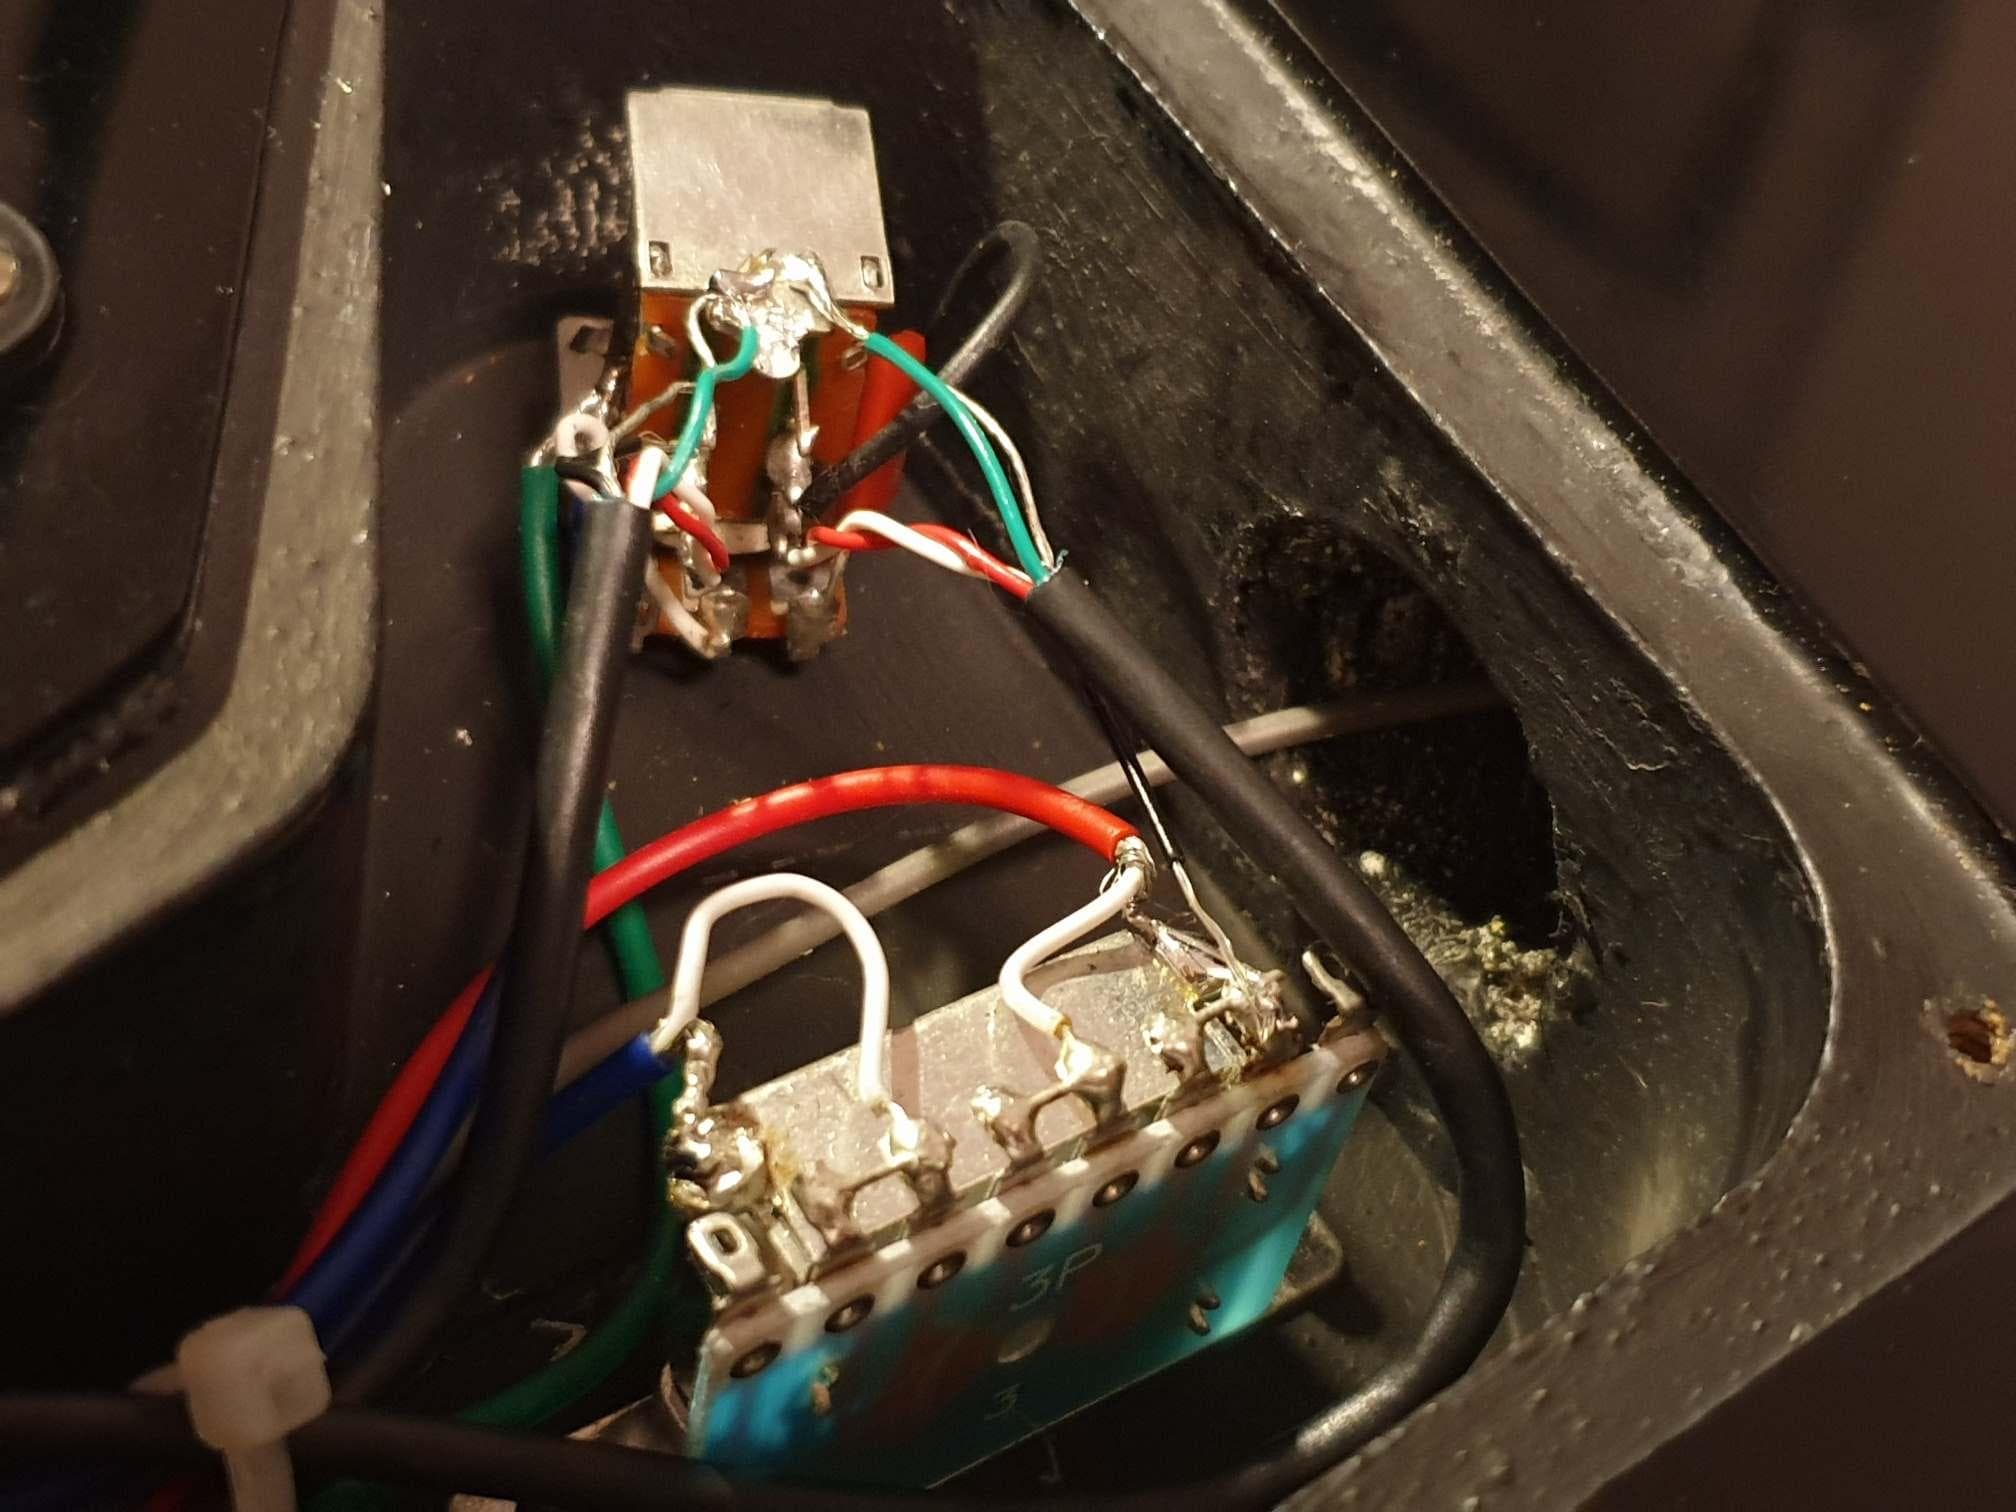
Here are 3 pictures of what I found upon opening the guitar:
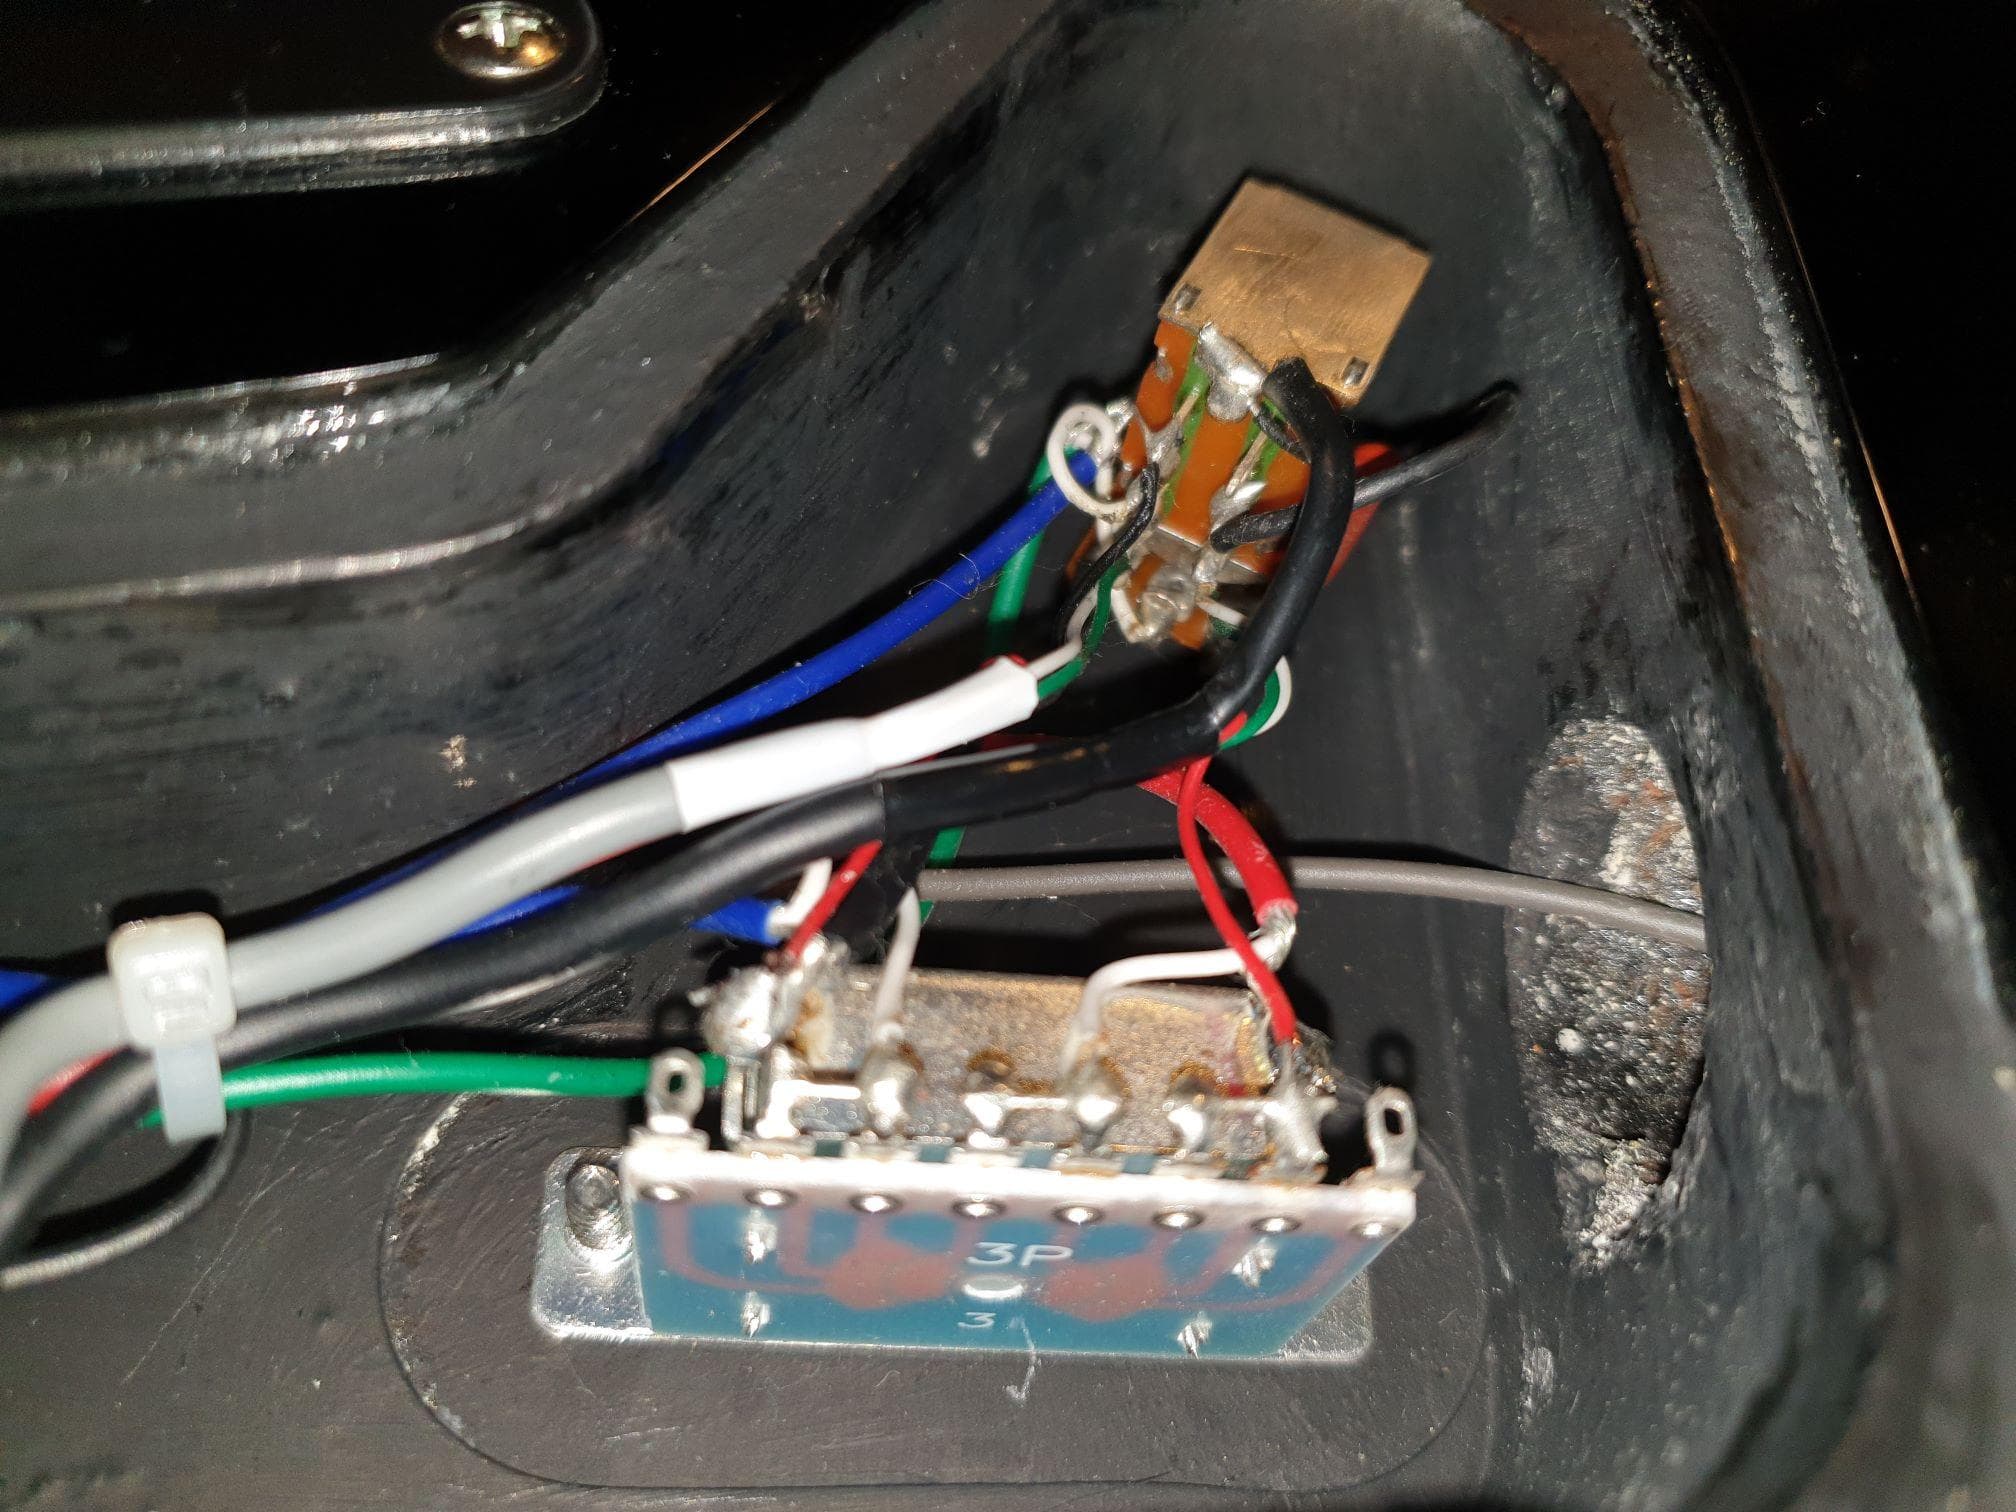
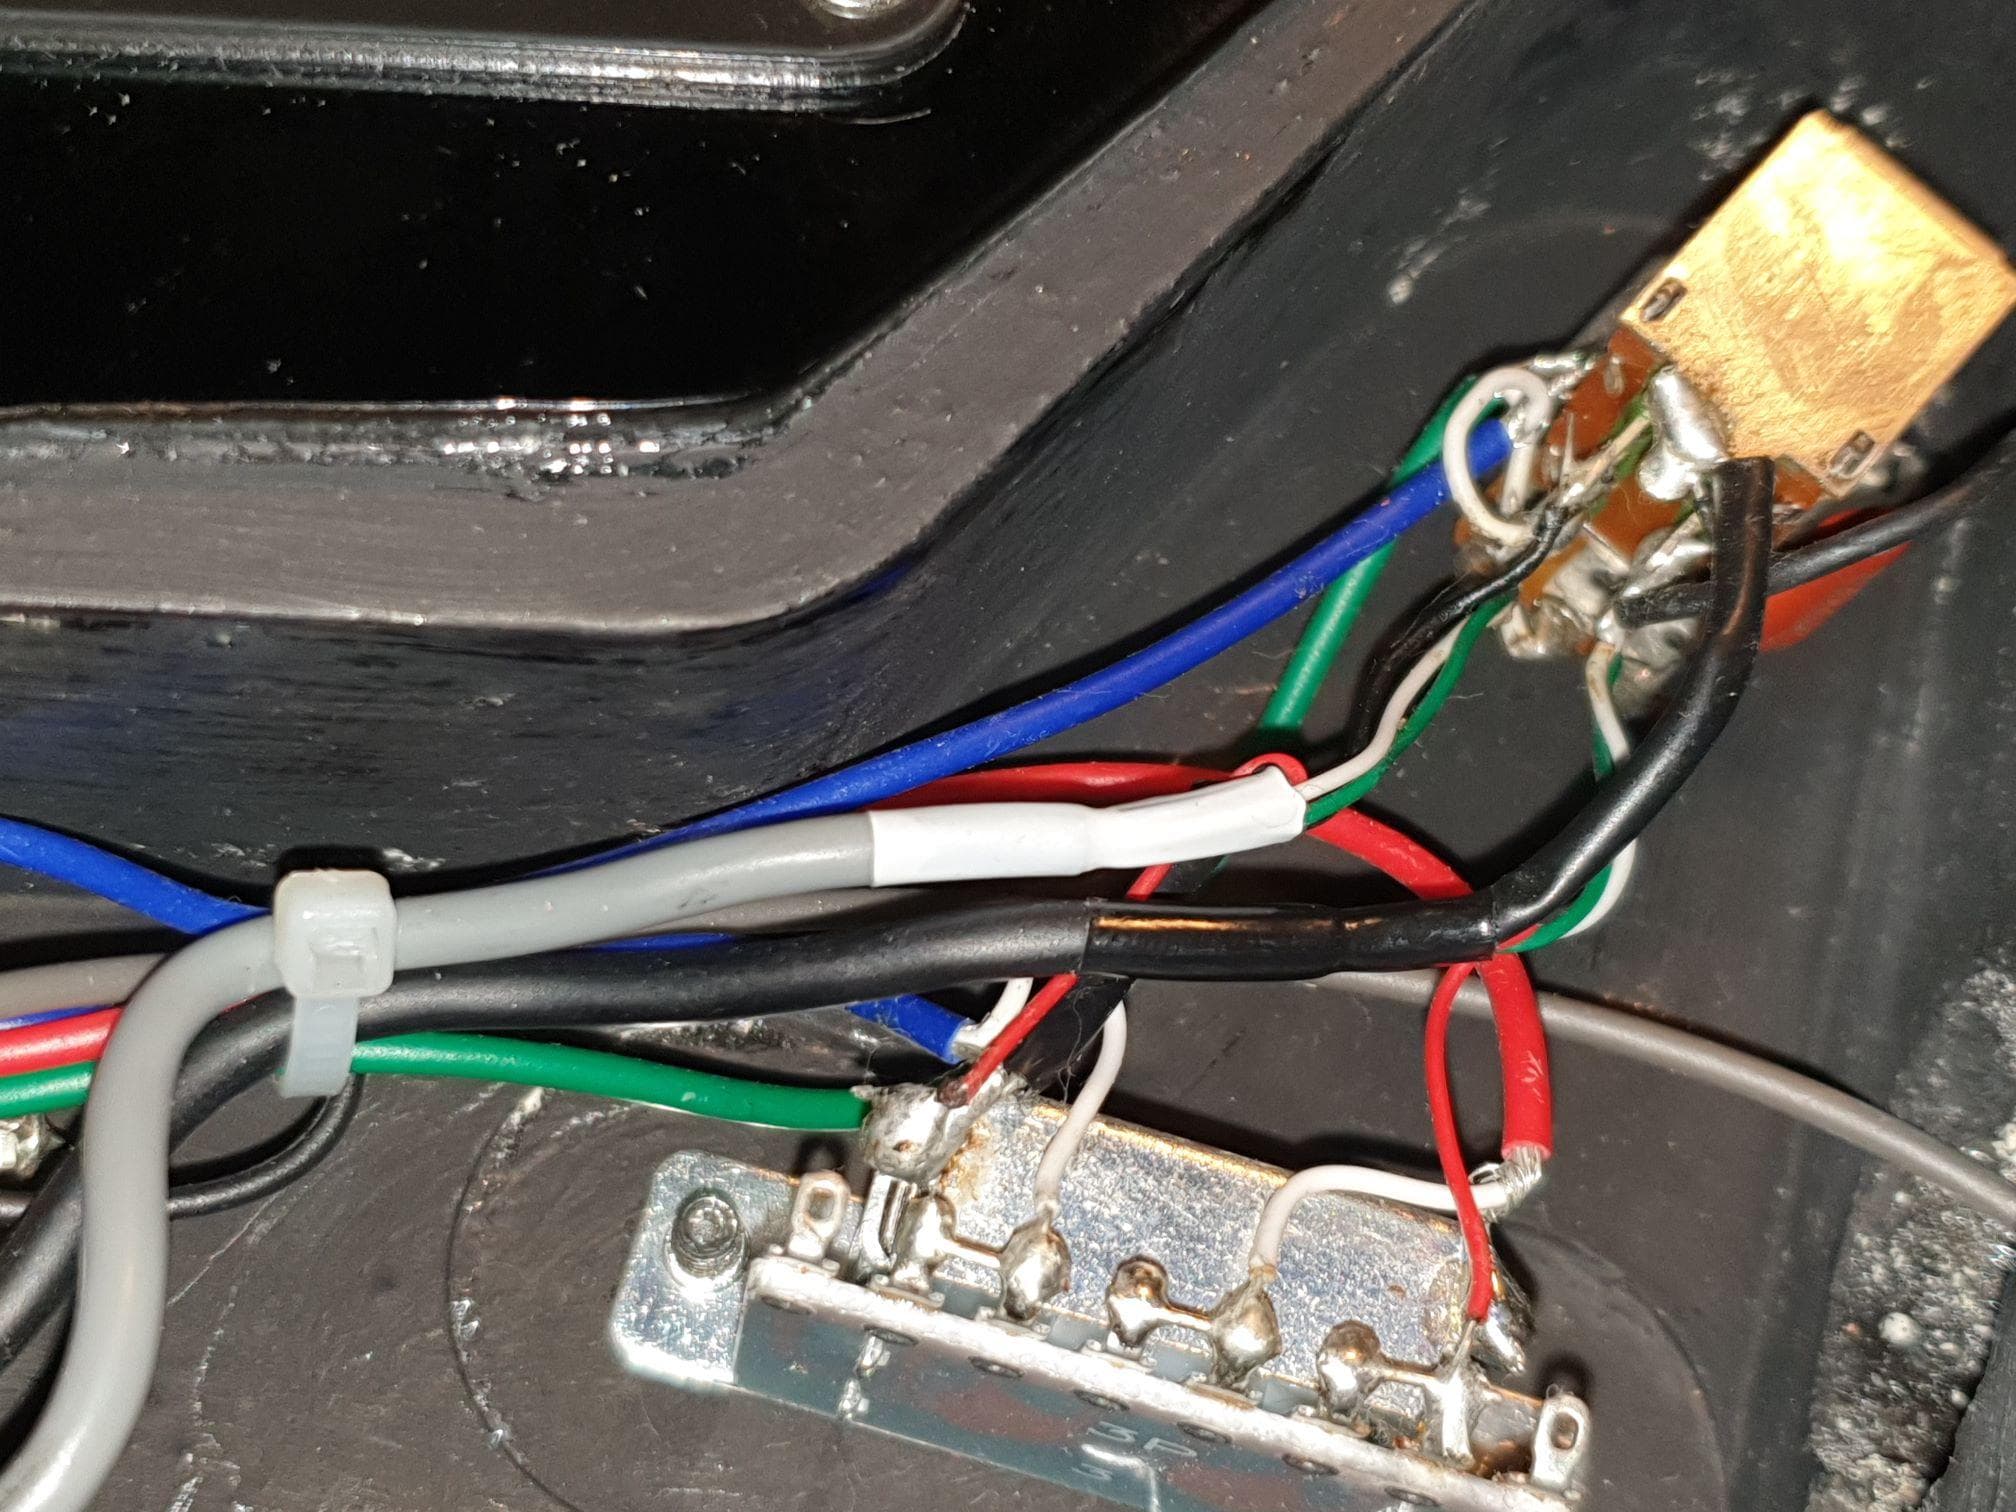
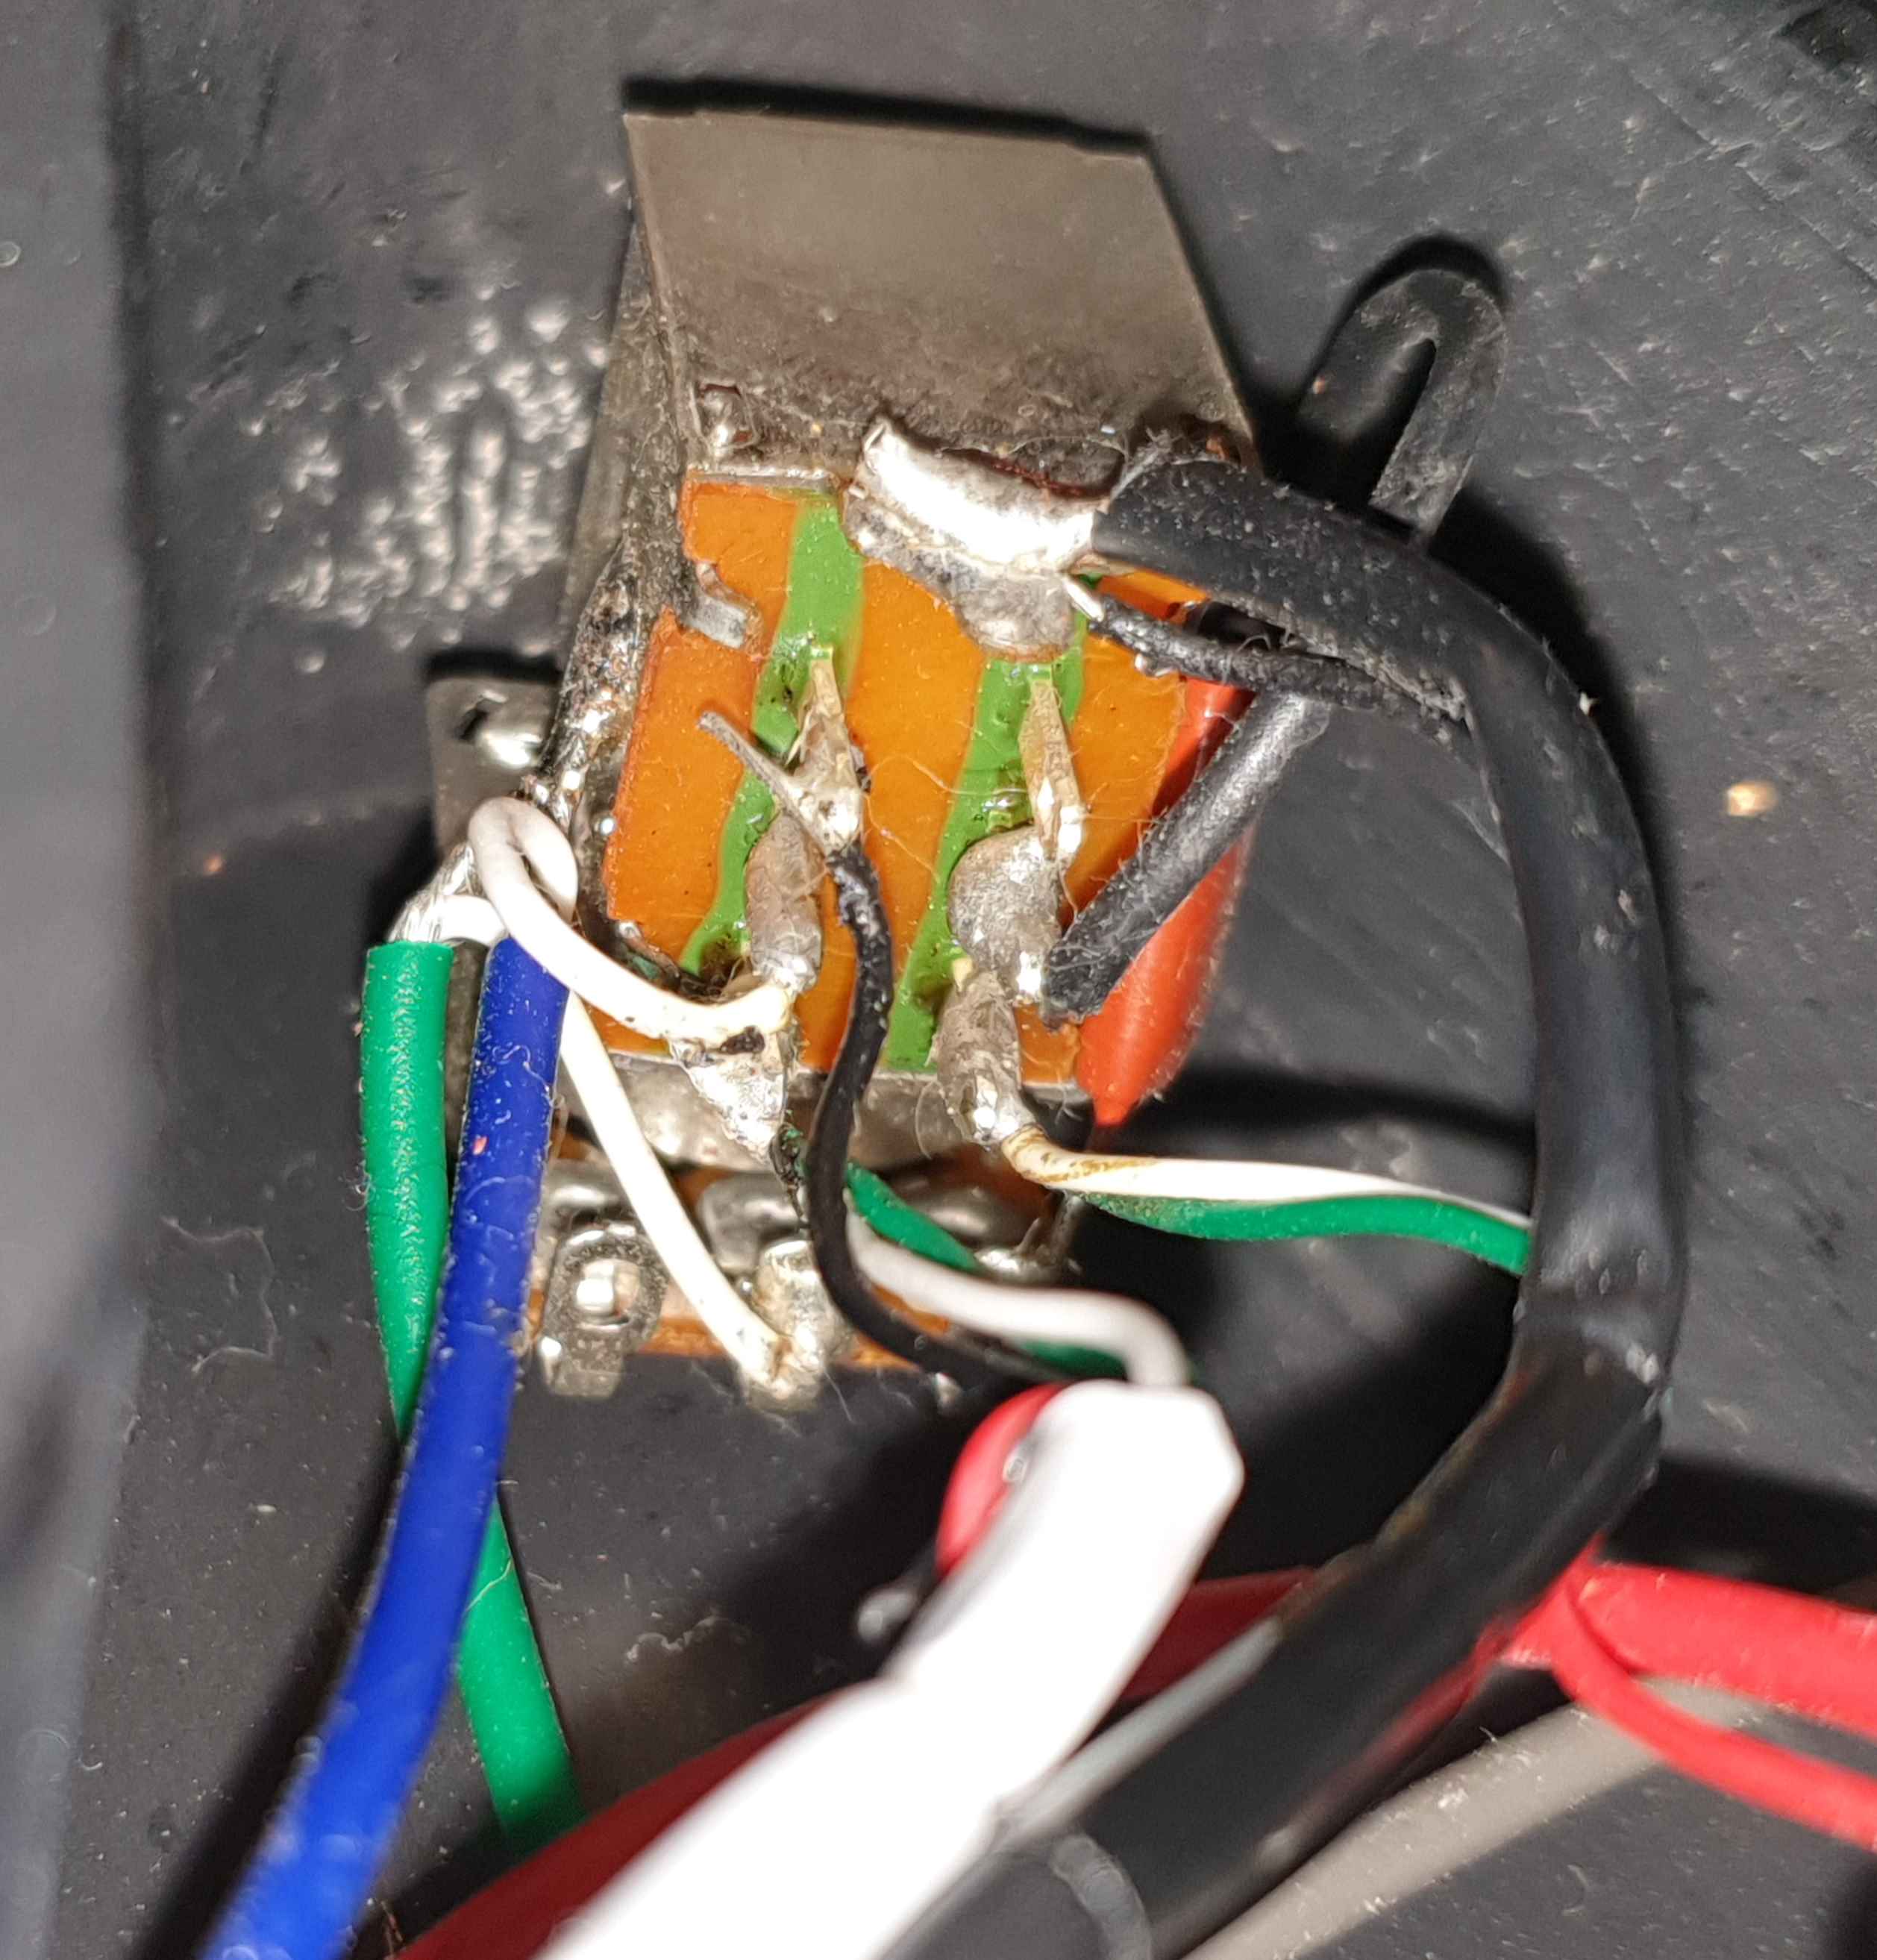
I'm not including the volume knob wiring, which is to the bottom left in the first 2 pictures as it's not involved at all in this operation. The rectangle with the 6 connectors is the top part of the push-pull / tone control; the bottom part is just a normal potentiometer system, similar with the volume one.
Here's a schematic of what I found inside:
And here's what it became:
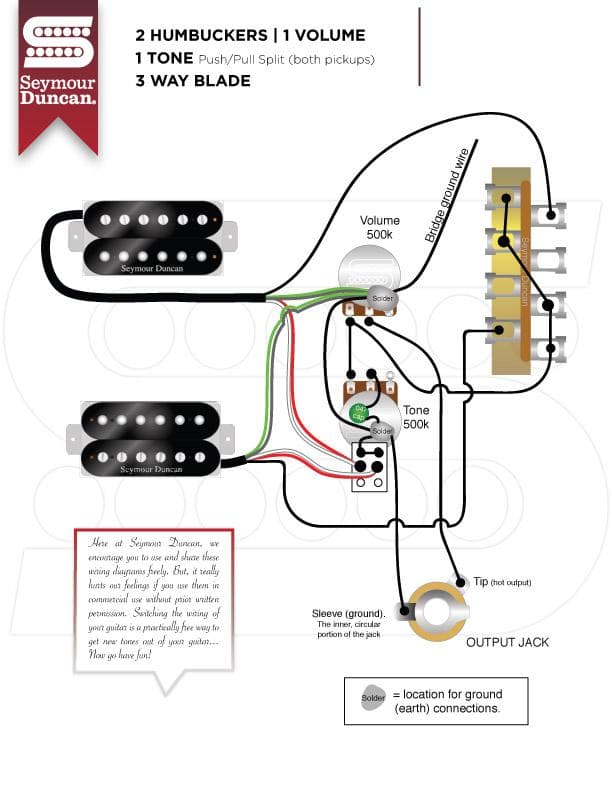
This is inspired by what Seymour Duncan recommend on their website:
And the wires themselves:
Not the best soldering ever, and the hot (black) bridge pickup wire is a bit extended, while the shield for the neck pickup wire is sort of nakedly dangling, but it seems to work right now.
The whole procedure:
- I desoldered the wires inside the guitar body (access through the backplate).
- I loosened the 2 pickups screws that control the pickup height, loosened them all the way until the pickups dropped inside.
- I removed the 4 screws holding the pickup frames.
- I removed the frames and then
- I removed the desoldered pickups (carefully pulled the wires through the holes in the guitar body) in this order: 1. bridge 2. neck
- I screwed the neck pickup into the white pickup frame with the 2 height controlling screws
- I inserted the neck pickup wire through the holes in the guitar body, through the bridge pickup cavity and all the way to the back of the guitar.
- I screwed in the 4 pickup frame screws into the neck pickup and the body of the guitar.
- I screwed the bridge pickup into the white pickup frame with the 2 scrwes.
- I inserted the bridge pickup wire through the whole in the guitar body all the way to the back of the guitar.
- I screwed the bridge pickup with the 4 frame screws to the guitar body.
Yay, a guitar that sings!
Nut
I also replaced the factory PRS nut with the drop-in Graph Tech Black TUSQ XL PT-6643-00 which keeps the tuning way nicer than the default, especially when the whammy bar is moved.
To remove the old nut one needs to just hit it. It's probably better to hit it from side to side (the PRS SE nut sits in a shallow indentation, lacquer might fly off if the nut is hit along the length of the neck). I hit it longitudinally, from the body towards the headstock and I was lucky to not chip anything off.
- I moved the strings out of the way.
- Covered frets 0 and 1 with a piece of cloth.
- I put a piece of wood on the cloth, just touching it and the neck, resting / pushing against the nut.
- I then hit it slowly with a hammer from fret 1 towards the nut and the nut came off immediately.
- I sanded the slot - there was some glue residue left on the wood.
- I dropped the Graph Tech TUSQ nut and tightened the strings, just to check how it sits. No sharp notes between no frets (fret 0) and fret 1, 2, 3 = no adjustment needed.
- Loosened and moved the strings out of the way again, used a bit of white wood glue in the nut slot, reseated the nut and tuned the guitar again. The new nut was set in 2-3 days, no movement whatsoever, regardless of whammy bar activity.
Tremolo Saddles
Graph Tech also produce a set of replacement saddles for PRS tremolos. I have one, it's the Graph Tech PS 8220-00.
The replacement procedure is very simple, as each individual saddle in the PRS trem block is held in place just by the string itself and by one screw with a spring around it (that also controls the intonation).
One at a time:
- I removed the string, unscrewed the saddle screw and removed the saddle.
- I adjusted the Graph Tech saddle height screws to roughly the same height as the original PRS saddle height screws. Graph Tech provide a hex wrench for this operation, which is one size smaller than the included PRS wrench, so pay attention.
- Mounted the Graph Tech saddle with the included Graph Tech screw.
- Mounted the new string.
After finishing with all strings I messed up with the intonation screws until I managed to obtain decent intonation. Then I messed up with the saddle heights until I got my prefered amount of fret buzz - just a tiny bit more buzz than nothing. I repeated these steps a few times, always getting the instrument in tune and well intonated.
Intonation
There's a simple algorithm to get the intonation right. By construction, the following hold true of any regular guitar:
- Picking the open string, i.e. on fret "zero", makes the whole length of the string vibrate.
- Fretting the string on fret 12 and picking it makes exactly half ot its length vibrate at 2x the frequency of the open string.
- Fretting the string on fret 24 and picking it makes exactly one quarter of its length vibrate at 4x the frequency of the open string.
To intonate, just adjust the string's tension until the open note is the correct one and then verify whether the note played on fret 12 is exactly one octave above, also whether the note played on fret 24 one octave more above.
- If the octave notes are slightly sharp it means that fret 12 and fret 24 are slightly above the half-length, respectively, three quarter length of the string. The effect is always more accentuated on the 24th fret. To fix this just "lengthen" the string by tightening the intonation screw on the saddle. This moves the saddle away from the headstock.
- Consequently, if the octave notes are slightly flat, then it means that frets 12 and 24 are slightly below the half-length / three quarter length of the string. Loosen the intonation screw on the saddle, thus moving the saddle towards the headstock and shortening the string.
Always slightly detune the string before adjusting the intonation screws and always returne all string to pitch afterwards.

Sustain!